Lets you select a conref, xref, or link target by specifying the file, element type, and element.
The Reference Manager is displayed when inserting a conref, xref, or link. To insert a conref, choose Insert Conref from the DITA menu, to insert an xref or link, use the Element Catalog. Note that the Reference Manager is only displayed for xref or link elements if they are defined as a “Container” rather than a “Cross-Reference” element in your EDD.
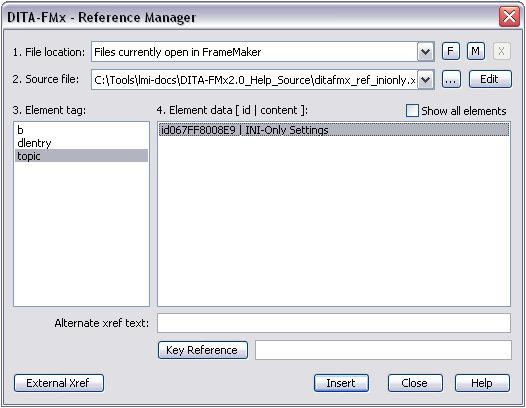
To insert a reference of any kind, first specify the file that contains the reference source. To select a source file, specify the file location using the File Location list. This list will initially only contain the label “Files Currently Open in FrameMaker” but you can browse through files on disk (without opening them first), by choosing the “F” button (select folder) or the “M” button (select map).
Selecting “Files Currently Open in FrameMaker” will display those files in the Source File list. Selecting the “F” or “M” buttons will list all “.xml” and “.dita” files in that folder or map. If you want to place a reference to a file that is not open, use the Browse button (“...”) to open another file.
By default the Element Tag list displays only elements that have id attribute values in the source file. For conrefs, this list is further restricted by displaying only elements that are valid at the current insertion point. If you want to limit the xref or link targets to a specific list of elements, use the XrefElements parameter in the ditafmx.ini file (for details, see INI-Only Settings). When you select an element tag name from the list, the available target elements display in the Element Data list. By default, only elements that have an ‘id’ value are available, but if you select the Show All Elements option, you will be able to select from all available elements of the selected type (this option is only available if the “Files Currently Open in FrameMaker” file location is selected).
The elements are listed with their ‘id’ and textual content. To place the reference, select an element and choose the Insert button. If you have selected an element that does not have an ‘id’ value, you will be prompted to provide an ‘id’ for that element (the ‘id’ is written to the source file, so be sure to save that file before exiting). If you want to specify text for the xref that is different than that of the target element, enter that text in the Alternate Xref Text field. To insert an xref to an external file, choose the External Xref button.
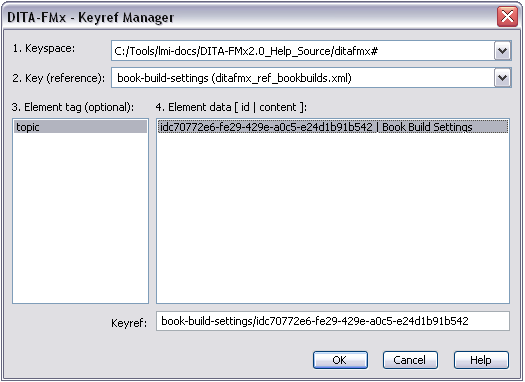
To insert a reference based on a key, choose the Key Reference button (or enter the key value in the Key Reference field). The Keyref Manager dialog allows you to select a key from the specified keyspace, then optionally select an element within the file referenced by that key. When placing an xref or link to the root topic in a file, it is only necessary to provide the key name. When inserting a conref, you should provide the key and the sub-element reference.
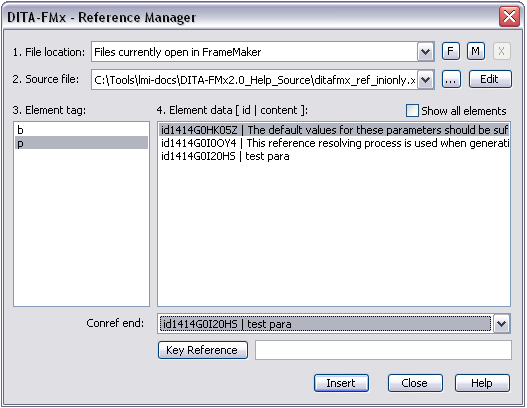
When inserting a conref, the Alternate Xref Text field is replaced with a Conref End list. This is populated with valid conref end targets based on your selection in the Element Data list.
If you double-click a conref or xref, the Reference Manager displays with the current reference selected. Choosing the Replace button inserts a new reference using the selected criteria in place of the old reference.
Conrefs are inserted as a locked range of text (like a text inset) and are tagged with the “DITA-Conref” color. By default this color is defined as blue, but because it is defined in the template, you can change it to suit your needs.
Xrefs and links are also inserted as a locked range of text, but no coloring or formatting is applied other than that specified by your structure application (EDD or template). When an xref or link is created or modified, the type attribute is set to the name of the target element, the format attribute is set to “dita,” and the scope attribute is set to “local.”
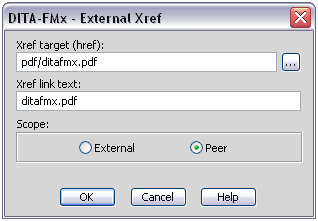
External Xref
Choose the External Xref button in the Reference Manager dialog to insert an xref or link that references files outside of the documentation set. Specify the target (the href attribute value) and the link text (the content of the xref or link element), as well as the value for the scope attribute (“external” or “peer”).
For URLs, set the scope value to “external”. The format attribute is automatically set to “html” for references of this type.
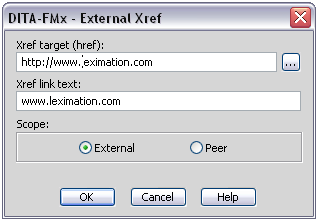
If you are creating an xref or link to other types of non-DITA content use the browse button (“...”) to select the file or enter the path and file name in the href field. When using the browse button, the link text will be set to the target file name, you are free to change it to whatever is needed. The format attribute is set to the value of the file extension.
Keep in mind that it is your responsibility to make sure that the path in the href field is accurate for the “published” document. Just because you use the browse button to select a file that exists while authoring, doesn’t mean that this same path is valid for the published environment. Paths to external references (“external” or “peer”) are not validated during the DITA-FMx book build or other publishing processes.
Once an external reference has been created you can modify it by double-clicking the xref.