Provides a quick and easy way to set attribute values and provide custom project-specific attribute values.
The Set Attributes command displays a modeless dialog that lets you easily set the attribute values on selected elements. Attribute names are displayed in a listbox on the left of the dialog, and when one is selected, an appropriate form field is displayed on the right for you to enter or select the value to apply.
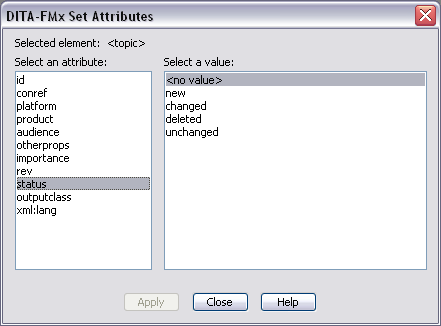
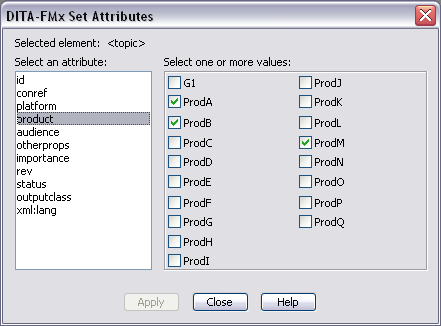
Depending on the underlying attribute type (Choice, String, Strings, Integer, Integers, Real, Reals, IDReference, IDReferences, and UniqueID), as defined in the EDD, the attribute values display in a different type of field. For a Choice attribute, the values specified in the EDD by the Choices element are displayed in a scrolling list box. For the Strings, Integers, Reals, and IDReferences attribute types, the values specified in the EDD by the “Default” elements is displayed as an array of checkboxes (up to 20), allowing you to select one or more values. All other attribute types are displayed in a simple text box. The checkboxes are particularly useful for managing the DITA filtering attributes (platform, product, audience, and otherprops).
Because the dialog is modeless, you can leave it open and whenever desired, select an element and apply new attribute values. In addition to the main DITA-FMx menu, the Set Attributes command is available from the context (right-click) menus.
The Set Attributes command provides a feature that lets you extend the values displayed for specific attributes, by allowing these to be specified in a text file. It also lets you specify different predefined attribute values for different projects. This mechanism lets you associate a filtering group name with a file system path. When editing a DITA file that is within the specified path, the values associated with that group are displayed with those defined in the EDD. These groups and their associated attribute names and possible values are defined in an INI file named (by default) FilterGroups.ini that is created in the FrameMaker\DITA-FMx folder.
The following sample filtering groups file defines two groups named ProductA and ProductB (these are both defined as an attribute of type “Strings” in the EDD). When you edit a DITA file that is in the path specified by group ProductA, selecting the product attribute will offer the three products listed (in addition to any already defined in the EDD) as options. Likewise, selecting audience or platform will offer those items as options.
[General]
ProductA=C:\projects\product-a
ProductB=C:\projects\product-b

[ProductA]
product=ProdALite|ProdAFull|ProdASimple
audience=Novice|Expert|Admin
platform=Windows|Mac|Linux
outputclass=style1|style2|style3|style4|style5|style6

[ProductB]
product=ProdBLite|ProdBFull
audience=User|Developer|Admin
platform=Windows|Mac|Linux|Solaris
outputclass=style1|style2|style3|style4|style5|style6
This mechanism can also be used for attributes defined as a type of “String” to predefine mutually exclusive attribute values similar to the attribute type of “Choice.” In the previous example, selecting the outputclass attribute (defined as a “String” in the EDD) from the list, would display a scrolling list box with the style names available for selection.
There are three “INI-Only” parameters that can be used to enhance the functionality of this command. In particular, you can specify an alternate location and name for the filtering groups file (possibly for use by a team on a network). To modify these settings, you must manually edit the ditafmx.ini file and update (or add) these values to the INIOnly section. For more information see INI-Only Settings.