Generates a FrameMaker book and chapter files from the current DITA map.
This command builds a FrameMaker book by creating FM binary files from each top-level topic reference in a DITA map. Any topic references within a frontmatter or backmatter wrapper element are considered “top-level” topic references and become separate FM files. Additionally, if your bookmap uses a part element to organize chapters, the file referenced by the part will become a separate FM file, and each child topic-referencing element in the part will be considered a top-level topic reference and will be added to the book after the generated part file.
If the current DITA map file has not been saved, it will be saved before processing begins. This command displays the Generate Map from Book dialog, which lets you specify the name and location of the book to be generated as well as the ability to select a ditaval file and set an alternate component template folder. You can also edit the associated book-build INI file (ditafmx-bookbuild.ini) or modify the default build settings from this dialog.
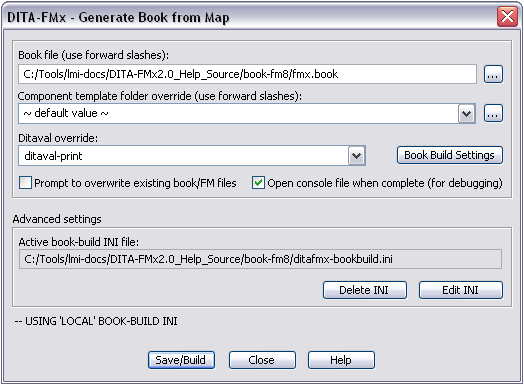
If you don’t want to be prompted when overwriting files from a previous build, deselect the Prompt to overwrite option and if you want the build log (console file) to automatically open after the build completes, select the Open console file option. If the path specified for the book file does not exist, it will be created for you.
The Component Template Folder Override option lets you specify an alternate location from which to read the component templates for the build. Similarly, the Ditaval Override option lets you select an alternate ditaval file. The default for both of these settings is defined in the book-build INI file (either local or default). The default ditaval can also be set in the Book Build Settings dialog (although the value in the book-build INI will override that in Settings).
Once the book file name has been set, the Edit INI button opens the “local” book-build INI file which provides advanced options for controlling details of the book component creation. If no book-build INI file exists in the specified book output folder, the Edit INI button copies the default book-build INI to this location before opening it for editing. The Delete INI button is provided to remove the local INI file. If no book-build INI file exists in the book output folder, the settings are read from the default location or from the Book Build Settings dialog (the settings in the book-build INI override those in the Settings dialog).
If the Use Language Templates option is enabled (in the Options dialog), a language-specific book-build INI file is read (if one exists). The language is determined by the xml:lang value in the map. For example, if the xml:lang value is “de-de”, the book-build INI file name would be ditafmx-bookbuild.de-de.ini.
The book build process starts by aggregating the DITA topic files referenced by the map and any submaps into a single XML file which is imported into FrameMaker using the “Book” structure application which creates the book and chapter files. The resulting FM files are named based on the root topic file’s relative path and filename with a “.fm” file extension.
If your map contains key definitions, a keyspace will be generated based on the selected ditaval file (if any). The default keyspace is reset after the build process completes.
Before using this command you should select the desired options in the Book Build Settings dialog, or carefully set up the book-build INI file for this project. The options specified in the Book Build Settings dialog are used for all book builds unless overridden by settings in a book-build INI file. This INI file is read from the same folder as the generated book file or in the user’s DITA-FMx folder ().
Many of the more advanced options, such as numbering and pagination, must be set manually in the book-build INI file. You can maintain separate book-build INI files for each project, or one common INI in the user’s DITA-FMx folder.
Conrefs and xrefs that reference content within the book, are updated to point to the new FM files. Any references to DITA files that are not part of the final book, remain pointing at the source DITA file (with the href attribute modified to suit the new path if it has changed). The paths to referenced graphics are updated to account for any changes due to relative differences between the source files and the location of the generated FM files. If your files do reference files that are not part of the book (typically graphics and possibly conrefs), it is important to choose an appropriate location to generate the book so that the FM files and referenced files can be easily moved as needed.
Maintaining a generated book
One possible way to build and maintain a custom book is described below. The use of a ditafmx-bookbuild.ini file and component templates should obviate the need to maintain a book in the way, but this method is offered as an alternative.
Generate the book and FM files with the Generate Book from Map command. Think of this as a “throw-away” book, and name it something temporary like temp.book.
Create a new book by doing a SaveAs from the throw-away book. This is your “real” book, give it an appropriate name.
Add your TOC, Index, and other non-DITA-based files to the “real” book.
Setup the properties for each file in the “real” book. Select each file and right-click, then choose Numbering, Pagination, or Set Up, as appropriate.
Now choose to generate your TOC and Index.
Save the “real” book.
Now, when you update your DITA files, re-run the Generate Book from Map command and overwrite the “throw-away” book and the FM content files will be replaced with fresh versions. Just close the “throw-away” book file that’s been generated, then open your “real” book and do an to refresh the TOC and Index and your book is ready to print.